Using rear mount Polarising filters
With a polarising filter you need to adjust it to get the maximum effect and this varies depending on the angle of the subject. It also needs to be rest when you rotate the camera through 90 degrees from landscape to portrait format.
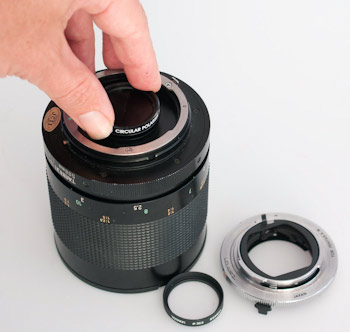
So here is a tip when using a polariser. With the polariser in your hand rotate the ring until the desired effect is achieved. Then, taking note of where the writing is around the filter, screw the filter onto the lens and adjust the ring until the writing is in the correct position. In this illustration the 30.5mm designation was at the top when the polariser was in its optimum position, so when the filter is screwed into the back of the Tamron lens it should be rotated so the 30.5 is at the top. If the lens is used in portrait mode you would rotate the filter 90degrees to compensate.
Also worth noting when using a polariser is that the filter is reversed and the filter may not be as effective. certainly when using a Jessops Circular polariser backwards it has no reducing effect on glare and just goes from producing a yellow hue to blue as you rotate. This can be resolved by taking the filter out of its mount and flipping it over so it's seated the wrong way round. Depending on filter, you may need a special tool to unscrew the retaining ring. Or watchmaker's screwdriver to flip out a retaining spring.
The filter screws in just like it would on the front and once in place is out of the way of fingers while ever the lens is mounted on the camera. This is fine for 95% of the filters you would consider attaching, but what if you have one with a rotating mount like a polariser, starburst or graduate filter? Once the lens is mounted on the camera the filter is out of reach.


These two photos show the affect of a rear mounted polariser filter. The left shot is without the polariser. Notice glare on the centre button of the poppy. This glare has also resulted in less contrast in the poppy's colours and less definition in the background donuts.
Mirror Lens Guides
Articles and Techniques showing you how to get the best from your mirror lens.

Walimex 500mm f/6.3 Mirror CANON EOS
The Walimex manual focus mirror lens is incredibly compact and lightweight. It has a sturdy metal casing and is ideally for travel, nature and wildlife photography. Also available in Olympus OM, 4/3, micro 4/3, Canon AF, FD, Nikon AF/MF, Minolta AF, MD, Pentax, Praktica, Samsung, Sony A, Leica R/SL mounts
BUY HERE
Danubia 500mm f/6.3 T2 Mount
The Danubia 500mm f/6.3 is a compact and lightweight lens with a t2 mount so adaptors can be purchased for any camera body. It has a 95mm filter thread and is suited for wildlife and sports photography.
BUY HERE
Vivitar 500mm f/8 mirror lens
The Vivitar manual focus mirror lens is compact and lightweight aluminium bodied model with Super Spectra Lens Coating. It has a T2 mouint so can be attached to just about all camera systems.
BUY HERE
Opteka 500mm f/8 Mirror CANON EOS
The Opteka 500mm f/8 is a manual focus mirror lens with 7 low dispersion glass elements in 6 groups. It compact and lightweight making it ideal for travel, nature and wildlife photography.
BUY HERE
Yuhtech 500mm f/8 Sony Mount
Yuhtech 500mm f/8 Mirror Tele is a compact and lightweight ultra telephoto lens with a Sony Alpha mount. It comes complete with a soft pouch and three (3) rear mounted, 30.5mm filters, (ND-2X, ND-4X and Skylight).
BUY HERE
Andoer 500mm f/8 mirror lens
The Andoer 500mm f/8 is a manual focus mirror lens with a 6 Elements in 6 groups construction. It has a T2 mouint so can be attached to just about all camera systems and comes with ND2, ND4 and skylight 1A filter set.
BUY HERE